
The C programming language is over 50 years old. Despite its age, it is still going strong. Many languages have tried to replace it. But so far none did succeed. To this very day, C is still the foundation on which all the software we use each and every day ultimately depends.
But with such a long history it comes as no surprise that there are a lot of legacy C projects out there. Projects that use outdated build systems and outdated practices. This is really a shame because, in this day and age, we have many awesome new tools at our fingertips that can help us tremendously when it comes to writing better and more robust C code.
So what if we would start a new C project from scratch today? How would we structure it? How would we build it? And what tools and features would we integrate into the build system from the start?
There are many possible answers to this question but in this article, I want to give you mine. And that’s why we are going to build the template of a modern C project from scratch. There will be code and it will compile into an executable but our main focus will be on the build system.
- Build System Features
- Project Structure
- Top-Level CMakeLists.txt File
- Conan Configuration
- The src Directory
- The tests Directory
- Installing the Tools
- Building the Project
- Running the Tests
- Final Thoughts
Build System Features
The build system of our new project shall have the following features:
- Cross-Platform
- Based on CMake
- Out-of-Source Builds Only
- Sanitizer Support
- Unittesting with ctest and libcheck
- Conan for Dependency Management
Those features deserve some more explanation. So let’s dive into them.
1. Cross-Platform
Developing for one platform only is boring. Also, C is a portable programming language. Therefore, our project will run on the three most popular operating systems out there:
- Linux
- macOS
- Windows
As compilers, we will support GCC, Clang, and Visual C++ 2022.
2. Based on CMake
When you create a new C project you have to organize your source code files and you have to build it somehow. On Windows and macOS a very popular solution to this problem is to use an IDE like Visual Studio or XCode and create an IDE project. The problem with this approach is that it ties you to one IDE. Which is quite unfortunate and not portable at all.
In the UNIX world a lot of projects used and still use makefiles. They are a bit like a scripting language that is strongly specialized in building software. The problem with makefiles is that they are quite inflexible and they are not really made to adapt the build to the system (installation paths of libraries, available header files, different compiler flags, etc.) it is running on.
Therefore, in the past many C software projects had many makefiles, all named like the platform they were intended for (e.g. Makefile.linux, Makefile.solaris, Makefile.bsd, etc.). Projects with dozens of makefiles were not unheard of. Obviously, this means a lot of duplication and it doesn’t scale well.
The solution was to create a tool that queries the system for all necessary information and generates a makefile that fits the system it is running on perfectly. And so the GNU Autotools (Autoconf/Automake) were born. If you ever compiled software on UNIX and you typed in the magic ./configure command, you have used Autotools before:

This was a great step forward but there was one problem: Not many people understood how Autotools project files actually work. As a result, maintaining build systems based on Autotools was a real pain and although everybody liked it when it worked, nobody was confident to fix it when it didn’t.
Eventually, this led to the rise of CMake, which is also a build generator. But unlike Autotools, it is a lot cleaner and easier to use. Another cool thing about CMake is that it isn’t limited to generating makefiles. In addition to makefiles it can generate all kinds of other build systems: Visual Studio projects, XCode projects, Ninja projects, and a lot more. This means you just write one set of CMake scripts. On Linux, you can then use them to generate a makefile while on Windows you generate a Visual Studio project from the very same CMake scripts (which might include an occasional platform check followed by platform-specific CMake code).
Because of those reasons, CMake is the most popular build generation tool in existence and it even comes bundled with Visual Studio.
Therefore, we will use CMake to build our software.
3. Out-of-Source Builds Only
In the past, we were all happy to put our source code files into a directory and find a way to make the compiler compile it. The result then was a directory containing a bunch of header files, source code files, object files, and a binary. This is called an in-source build because we put all build artifacts in the same directory as the source code.

This approach has a number of drawbacks:
- There can be only one type of build at a time (release, debug, special optimizations, etc.). Creating another build overwrites the existing one.
- It is easy to delete a source code file by accident when you just want to delete an object file.
- A text search on the source files might be cluttered with matches from the object files.
And if we are honest, the only reason we do it this way is that it is the easiest way to get our project to build.
A much better way is to keep the source code in one directory and create the build in a completely separate directory. This is called an out out-of-source build.
The other option is an out-of-source build. With a build system capable of out-of-source builds we can just (and often have to) create a new build directory and compile in there whenever we want to have an additional build. This way we can keep as many builds in parallel and our source directory doesn’t get polluted with build artifacts.
Our project shall support out-of-source builds and we will also disallow the creation of in-source builds.
4. Sanitizer Support
Sanitizers are advanced runtime checks that are built into the binary by the compiler. They replace critical functions from the C Standard Library like malloc, memset, free, and so on. They are supported by gcc, clang, and Visual C++ to varying degrees with clang being the best closely followed by gcc.
The most famous sanitizer is Asan, the address sanitizer. It detects reads and writes on invalid memory addresses like stack overflows, heap overflows, read and write after free, and other accesses to invalid memory. Once an invalid access has been detected, Asan will output some diagnostic information and crash the program. If a binary contains debug information the diagnostics will even include the line numbers of the locations in the program where the invalid access occurred and where relevant memory was allocated or freed.
There are the following sanitizers:
| Name | Description |
| Address Sanitizer | Detects accesses to invalid addresses |
| Leak Sanitizer | Detects memory leaks |
| Thread Sanitizer | Detects data races in multi-threaded programs |
| Memory Sanitizer | Detects use of uninitialized memory |
| Undefined Behaviour Sanitizer | Detects undefined behaviour |
Address Sanitizer is available on Linux, macOS, and in an experimental version for Visual C++ on Windows. With all other sanitizers, I only had success on Linux so far.
Most sanitizers cannot be combined with each other. Address Sanitizer and Leak Sanitizer are the exception here. On Linux, Leak Sanitizer is even enabled by default if you compile with Address Sanitizer.
We want our build system to be able to build binaries with all relevant sanitizers. All sanitizer builds must include debug information because it makes finding the cause of a sanitizer-induced crash a lot easier.
Sanitizers are especially powerful if you combine them with unit tests. It also pays off to create stress tests that push your code to its limits and run them with sanitizer builds (you might be surprised about the out-of-bounds and overflow bugs you find). Therefore we want the Address Sanitizers build to be the default instead of the non-instrumented debug build.
5. Unittesting with ctest and libcheck
Every software project should have unit tests. They shouldn’t become a religion and be combined with common sense but they are a very powerful tool that can help us to guarantee the quality of our code and good tests can give you a peace of mind that you will never want to miss again. Don’t forget that it is better to have fewer high-quality tests than lots and lots of throw-away tests, though.
For unit testing, we will use the popular C unit testing library libcheck and we will make the tests known to CMake so we can use ctest (which comes with CMake) as the test runner.
6. Conan for Dependency Management
One of the greatest weaknesses of C (and C++) is dependency management. Probably the main reason for this is the complex building and linking process as well as subtle inconsistencies between operating systems and compilers.
So whenever a C project grows and it is time to add some third-party open source libraries (like OpenSSL, libxml2, pcre, or one of the countless others) things start to get ugly.
Often, you have to download the source and build it yourself. Then you have to make sure that the compiler finds the header files and that the linker finds the library files. On Linux, you can install many libraries with your distributions package manager. On macOS you can use brew, instead. But what if you don’t like the versions provided by your package manager? Or what if you have to be cross-platform and you want to have the same version of the library on every operating system? Or you get some weird linker problems in some obscure circumstances?
It’s really a mess!
Languages like Python or Rust have solved this problem long ago by coming with their own package manager that works on all supported operating systems and allows the user to select the exact version of a package to be installed.
But those languages have one very important advantage: Finding and installing libraries and linking them has been more streamlined for them from the very beginning.
With C and C++ building a package manager is much harder because of all the extra complexities involved. But thankfully for us, some people have tried really hard, and out of the few C/C++ package managers out there Conan is probably the best one right now. They even have a big repository that goes by the name Conan Center which contains packages of thousands of popular C and C++ libraries.
Installing packages is nearly as easy as it is with the Python package manager pip. For most packages there are pre-compiled binaries available for Linux, macOS, and Windows. If no binaries are available (or they have been built with the wrong ABI) Conan is able to compile the package from source, automatically. The same goes for the direct and transitive dependencies of your package. You can also select the exact version of a package you want to be installed and you can also choose if you want to link a library statically or dynamically.
Considering all those great features it is pretty clear that we want to use Conan in our example project. Our program has no dependencies of itself but we need to install libcheck somehow and we need to install it on Linux, macOS, and Windows. It would be quite cumbersome if we compiled and integrated it on all 3 platforms on our own.
But you will be surprised how easy it is with Conan. And if you use this template for one of your own projects adding more libraries will be as easy as specifying them in a text file.
Project Structure
Our program is a small binary that computes the dot product of a 2D vector and a 3D vector. To accomplish this the project also includes the very simplistic implementation of a 2D vector and a 3D vector.
As was said before the program is not very important and it just gives us an excuse to write the build system. In the same spirit, the vectors give us an excuse for writing unit tests.
The project is structured as follows:
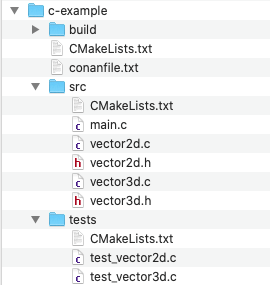
On the top level of our project directory, we have a CMakeLists.txt file which is the entry point for CMake into our project. It contains all the general project information like the name of the project, warnings level, build type, default build type, and so on. Next to it, there is the conanfile.txt. It contains the list of dependencies we want Conan to fetch for us from its online repository that we want to link with our software.
There are three subdirectories. The first one is the build directory. This is the directory we will use to create our build in. It is not referenced by the build system in any way. So we could just rename it or create other build directories with other names to create other builds of the project.
The next directory is the src directory. It contains its own CMakeLists.txt which gives CMake the instructions on how to build the source files in this directory. These are the main.c file, which contains only the main function. This file makes use of the other two C files vector2d.c and vector3d.c and their headers. To create the binary we have to compile all 3 C files and link them together.
Finally, there is the tests directory. It contains a CMakeLists.txt file and test_vector2d.c and test_vector3d.c. The two C files contain unit tests for both vectors and the CMakeLists.txt tell CMake how to compile them. Both test files contain their own main function and compile to a separate binary.
Top-Level CMakeLists.txt File
The configuration of CMake projects resides in so-called CMakeLists.txt files. There is a top-level file and there is one additional CMakeLists.txt in each subdirectory that contains source code that needs to be built.
Since this is our first contact with CMake and the top-level file is also comparatively long, we will split the file into sections so we can discuss it bit by bit.
Let’s start at the top of the file:
cmake_minimum_required(VERSION 3.20)

if ("${CMAKE_BINARY_DIR}" STREQUAL "${CMAKE_SOURCE_DIR}")
  message(FATAL_ERROR "In-source builds are not allowed.
    Please create a subfolder and use `cmake ..` inside it.
    NOTE: cmake creates CMakeCache.txt and CMakeFiles/*.
          Remove them, or cmake will refuse to work.")
endif()
At the very beginning of the file, we set the minimum version of CMake that is required to build this project. If you try to build it with an older version CMake will quit with an error message.
Next, we check if the binary directory (the directory in which you try to build the project) is the same as the source directory. If this is the case we print a fatal error message which informs the user that some files have to be deleted before trying again. Printing a fatal error message terminates CMake, automatically.
This check prevents in-source builds and forces the user to build the software in a separate directory. If the user doesn’t delete those files he will get an error message again even if he tries from a separate directory. The reason for this is that CMake caches information from the last run in those files and unfortunately, we can’t prevent it from creating them.
project(example C)

set(C_STANDARD 99)
set(C_STANDARD_REQUIRED ON)

if(MSVC)
    add_compile_options(/W3)
else()
    add_compile_options(-Wall -Wextra)
endif()
Now we set the project name to “example” and we tell CMake that this project is written in the C programming language. Next, we set the C standard to use to C99 and then we tell CMake that this standard is required. If we don’t require it CMake sees it only as a recommendation and will try to compile our project with an older standard if the compiler doesn’t support C99.
After that, we set a high warning level for the compiler. For Visual Studio we use the /W3 flag while for all other compilers (gcc and clang) we use the -Wall and the -Wextra flag.
Next we add the build directory to the CMAKE_PREFIX_PATH (this is where CMake searches for CMake files to include). The reason for this is that Conan generates files in the root of the build directory that CMake needs to find the libraries installed by Conan. We also set CMAKE_MAP_IMPORTED_CONFIG_* to RELEASE. With this, we tell CMake that it shall link all of our build types against the RELEASE version of the libraries we install via Conan (in our example project this is only libcheck). If we didn’t do this CMake would try to link the Debug build against libcheck Debug, Asan against libcheck Asan, and so on, and would fail because we only build the Release Version of the library via Conan:
list(APPEND CMAKE_PREFIX_PATH ${CMAKE_BINARY_DIR})

# Build all build types against the release version of Conan libs if no
# matching build of the Conan libs is available
set(CMAKE_MAP_IMPORTED_CONFIG_DEBUG RELEASE)
set(CMAKE_MAP_IMPORTED_CONFIG_ASAN RELEASE)
set(CMAKE_MAP_IMPORTED_CONFIG_LSAN RELEASE)
set(CMAKE_MAP_IMPORTED_CONFIG_TSAN RELEASE)
set(CMAKE_MAP_IMPORTED_CONFIG_MSAN RELEASE)
set(CMAKE_MAP_IMPORTED_CONFIG_UBSAN RELEASE)
Next, we check if a build type has been passed by the user and if not we set it to “Asan”:
if(NOT CMAKE_BUILD_TYPE)
    set(CMAKE_BUILD_TYPE "Asan")
endif()
This section needs a bit more explanation. Here we configure build types for all the different sanitizers we want to support:
if(MSVC)
    if(NOT "Asan" IN_LIST CMAKE_CONFIGURATION_TYPES)
        list(APPEND CMAKE_CONFIGURATION_TYPES Asan)
    endif()

    set(CMAKE_EXE_LINKER_FLAGS_ASAN "/DEBUG /INCREMENTAL:NO")
    add_compile_options("$<$<CONFIG:Asan>:/DEBUG /fsanitize=address>")
else()
    # Support for sanitizer build types
    set(CMAKE_C_FLAGS_ASAN
        "-fsanitize=address -fno-optimize-sibling-calls -fsanitize-address-use-after-scope -fno-omit-frame-pointer -g -O1"
        CACHE STRING "Build with AddressSanitizer"
        FORCE)

    set(CMAKE_C_FLAGS_LSAN
        "-fsanitize=leak -fno-omit-frame-pointer -g -O1"
        CACHE STRING "Build with LeakSanitizer"
        FORCE)

    set(CMAKE_CXX_FLAGS_TSAN
        "-fsanitize=thread -g -O1"
        CACHE STRING "Build with ThreadSanitizer"
        FORCE)

    set(CMAKE_C_FLAGS_MSAN
        "-fsanitize=memory -fno-optimize-sibling-calls -fsanitize-memory-track-origins=2 -fno-omit-frame-pointer -g -O2"
        CACHE STRING "Build with MemorySanitizer"
        FORCE)

    set(CMAKE_C_FLAGS_UBSAN
        "-fsanitize=undefined"
        CACHE STRING "Build with UndefinedBehaviourSanitizer"
        FORCE)
endif()
For Windows, we only support Asan as the only sanitizer. This makes the first branch of the if a bit shorter. Since Visual Studio is multi-config we have to add a new configuration to the Visual Studio project. Therefore, we first check if an Asan configuration already exists, and if not we add it. Then we enable debug symbols for the Asan config and we add the flag to enable the address sanitizer to the compile options of the Asan build.
For Linux and macOS the else branch is evaluated. Since we use make on both platforms and it is single-config no config is added, instead the flags used in our makefiles are determined here. Therefore, we put the linker flags required to enable address sanitizer into the variable CMAKE_C_FLAGS_ASAN. This variable is passed by CMake to the linker whenever the build type equals the last word of the variable name (“ASAN”) and is not case-sensitive. So it doesn’t matter if the user passes “asan”, “Asan”, or “ASAN”.
The variables for the other build types work the same. So we have a nice implicit switch case statement here. When the build type is “Asan” CMake will pass the address sanitzier flags to the linker. If the build type is “Lsan” CMake will pass the leak sanitizer flags to the linker. The same goes for the other sanitizers.
In the final section of the CMakeLists.txt file, we tell CMake that src is a subdirectory and that it should go there and look for another CMakeLists.txt. Then we tell CMake to find a package named check and we also tell it that it is required. So if libcheck is not found CMake will exit with an error. Finally, we enable CMakes testing support and add the directory with our unit tests as a subdirectory so that CMake goes there and reads its CMakeLists.txt file:
add_subdirectory(src)

find_package(check REQUIRED)
enable_testing()

add_subdirectory(tests)
Conan Configuration
We are too lazy (or too sane) to install libcheck manually and we want the installation to work the same on all three platforms. Therefore, we need to put the following conanfile.txt in the root directory of our project:
[requires]
libcheck/0.15.2

[generators]
CMakeDeps

[options]
libcheck/*:with_subunit=False
This is basically an INI file. In the requires section we say that we want to link our software with libcheck and we want to have version 0.15.2 and nothing else. The next section is the generators section. Here we tell Conan that we want it to use the CMakeDeps generator to generate files that CMakes find_package function can use to figure out where Conan has installed the packages from the requires section.
The last section is probably the most interesting one. Basically, every Conan package defines so-called options. Options allow us to tell Conan which features a package shall be built with. So for example, the Conan package of OpenSSL has options to enable or disable each algorithm that it supports. And the SDL package has options to configure what graphics libraries it shall be built with (e.g. libpng, libjpeg, etc.).
The most important option that is supported by nearly every package out there is shared. If you set shared to True the library will be built as a shared library (DLL). If you set it to False the library will be built as a static library. This is very important to control if you want your project to link libraries statically or dynamically.
Here we tell Conan that we want to build libcheck without the extra dependency subunit because this is an advanced feature we don’t need for our purposes.
The src Directory
The CMakeLists.txt of the src directory is much shorter than the top-level file:
add_library(example_objs OBJECT
    vector2d.c
    vector3d.c
)

set_property(TARGET example_objs
    PROPERTY
    INTERFACE_INCLUDE_DIRECTORIES
    "${CMAKE_SOURCE_DIR}/src")

find_library(MATH_LIBRARY m)
if(MATH_LIBRARY)
    set_property(TARGET example_objs
        PROPERTY
        INTERFACE_LINK_LIBRARIES
        ${MATH_LIBRARY})
endif()

add_executable(example
    main.c
)

target_link_libraries(example PRIVATE example_objs)
We could make this file even shorter and a lot simpler if we just called the add_executable function, told it that our executable is named “example” and passed the names of our 3 source files. This would be only one line: add_executable(example main.c vector2d.c vector3d.c)
This would be (nearly) enough information for CMake to compile our three source files into an executable and we would be done (on some systems we would also need to link the math library).
But we have good reason to do it differently. The thing is that we will need to link our unit tests against the object files vector2d.o and vector3d.o. We could add the path to the C files when compiling the tests. But then we would compile vector2d.c and vector3d.c again for every test that needs them.
There is a better way, though. CMake allows us to create so-called “object libraries”. An object library is a bit like a static library. But while for a static library, a .a file is created on disk that contains the object files, an object library is purely virtual and only exists within CMake. So what we do here is we create an object library named example_objs by calling add_library with the parameter OBJECT and the source files that we want to be part of the object library. Later we then call add_executable to define our example executable which only contains main.c as a source file. We then tell CMake to link our executable with our object library example_objs.

This seems complicated at first but the beauty of this is that if we want to link all object files, except the one containing the main function to create other executables (like our tests for example) we can do so easily and at as many places across our project as we want to. We just have to create new executables and link them with the object library.
Propagation of Include and Lib Paths
Now you might have one important question left. What the heck are those ugly set_property function calls doing?
We just created so-called targets when we called add_library and add_executable. Targets in CMake are a lot more powerful than targets in makefiles. A target in CMake has metadata, so-called properties. With the first set_property call we set a property called INTERFACE_INCLUDE_DIRECTORIES that contains the include directories that a consumer needs to know to find the header files vector2d.h and vector3d.h. The block of the other set_property call checks if the math library exists as a library separate from libc and if that is the case it adds the math library to the property INTERFACE_LINK_LIBRARIES so that consumers know that they need to link the math library.
The idea here is that a third-party library provides a .cmake file that defines a target with all the info needed to build against it contained in the properties of the target. A consumer can then just tell CMake to link against this target and everything works. No more variables with include paths, no library paths, no lib names. Linking can’t be easier.
Of course, we don’t need the include property to build main.c because it lives in the same directory as the header files and so it can’t miss them. That’s not true for our tests, though. They will need to be told where to look for the headers. Without the include property we would have to add our src directory as an include directory in the CMakeLists.txt file of the tests directory.
The Source Code
As said before, we only really care about the build system so nothing to discuss here.
main.c:
#include <stdio.h>

#include "vector2d.h"
#include "vector3d.h"

int main(void)
{
    Vector2d vec1 = {.x = 4.5f, .y = 2.0f};
    Vector2d vec2 = {.x = 2.5f, .y = 8.0f};

    Vector3d vec3 = {.x = 1.0f, .y = 5.0f, .z = 3.5f};
    Vector3d vec4 = {.x = 8.0f, .y = 3.5f, .z = 1.0f};

    float dot12 = vec2_dot_product(&vec1, &vec2);
    printf("Dot Product of (%.02f, %.02f) * (%.02f, %.02f): %.02f\n", vec1.x, vec1.y, vec2.x, vec2.y, dot12);

    float dot34 = vec3_dot_product(&vec3, &vec4);
    printf("Dot Product of (%.02f, %.02f, %.02f) * (%.02f, %.02f, %.02f): %.02f\n", vec3.x, vec3.y, vec3.z, vec4.x, vec4.y, vec4.z, dot34);

    return 0;
}
vector2d.h:
typedef struct {
    float x;
    float y;
} Vector2d;

float vec2_dot_product(Vector2d *a, Vector2d *b);
float vec2_length(Vector2d *vec);
void vec2_norm(Vector2d *vec);
vector2d.c:
#include "vector2d.h"

#include "math.h"

float vec2_dot_product(Vector2d *a, Vector2d *b)
{
    return a->x * b->x + a->y * b->y;
}

float vec2_length(Vector2d *vec)
{
    return sqrt(vec->x*vec->x + vec->y*vec->y);
}

void vec2_norm(Vector2d *vec)
{
    float length = vec2_length(vec);
    vec->x /= length;
    vec->y /= length;
}
vector3d.h:
typedef struct {
    float x;
    float y;
    float z;
} Vector3d;

float vec3_dot_product(Vector3d *a, Vector3d *b);
float vec3_length(Vector3d *vec);
void vec3_norm(Vector3d *vec);
vector3d.c:
#include "vector3d.h"

#include "math.h"

float vec3_dot_product(Vector3d *a, Vector3d *b)
{
    return a->x * b->x + a->y * b->y + a->z * b->z;
}

float vec3_length(Vector3d *vec)
{
    return sqrt(vec->x*vec->x + vec->y*vec->y + vec->z*vec->z);
}

void vec3_norm(Vector3d *vec)
{
    float length = vec3_length(vec);
    vec->x /= length;
    vec->y /= length;
    vec->z /= length;
}
The tests Directory
The tests directory contains the source files for the two test programs (test_vector2d.c and test_vector3d.c) and a CMakeLists.txt file with instructions on how to build the test programs.
Let’s start with the CMakeLists.txt:
#
# Tests for Vector2d
#
add_executable(test_vector2d test_vector2d.c)

target_link_libraries(test_vector2d PRIVATE
    Check::check example_objs)

add_test(NAME test_vector2d COMMAND test_vector2d)

#
# Tests for Vector3d
#
add_executable(test_vector3d test_vector3d.c)

target_link_libraries(test_vector3d PRIVATE
    Check::check example_objs)

add_test(NAME test_vector3d COMMAND test_vector3d)
We define an executable for each of the test programs with add_executable and tell CMake which C file to use to build it. Then we tell CMake to link the binary against the CMake target of libcheck and against the object library we defined in the CMakeLists.txt in the src directory.
One might think that when we define a target in a subdirectory it is only available in this subdirectory and maybe also in the directories below this subdirectory. But this is not true.
As we can see here with our example_objs object library, a target is available in all other CMakeLists.txt files of a project, no matter where they are located.
Finally, we call add_test to tell CMake that there are two test suites and what command it needs to call to execute them.
Now on to the tests. It’s quite a bit of code but we will discuss it at the end.
test_vector2d.c:
#include <stdio.h>
#include <stdlib.h>

#include <check.h>

#include "vector2d.h"

START_TEST(test_vec2_dot_product)
{
    Vector2d v1 = {.x = 7.0f, .y = 2.0f};
    Vector2d v2 = {.x = 3.0f, .y = 6.0f};
    ck_assert_float_eq(vec2_dot_product(&v1, &v2), 33.0f);
}
END_TEST

START_TEST(test_vec2_dot_product_perpendicular)
{
    Vector2d v1 = {.x = 1.0f, .y = 0.0f};
    Vector2d v2 = {.x = 0.0f, .y = 2.0f};
    ck_assert_float_eq(vec2_dot_product(&v1, &v2), 0.0f);
}
END_TEST

START_TEST(test_vec2_length)
{
    Vector2d v1 = {.x = 5.0f, .y = 0.0f};
    ck_assert_float_eq(vec2_length(&v1), 5.0f);

    Vector2d v2 = {.x = 0.0f, .y = 3.0f};
    ck_assert_float_eq(vec2_length(&v2), 3.0f);
}
END_TEST

START_TEST(test_vec2_norm)
{
    Vector2d v1 = {.x = 5.0f, .y = 3.0f};

    vec2_norm(&v1);

    ck_assert_float_eq(vec2_length(&v1), 1.0f);
}
END_TEST

Suite* vector2d_suite(void)
{
    Suite *s;
    TCase *tc_core;

    s = suite_create("Vector2d");

    /* Core test case */
    tc_core = tcase_create("Core");
    tcase_set_timeout(tc_core, 10);

    tcase_add_test(tc_core, test_vec2_dot_product);
    tcase_add_test(tc_core, test_vec2_dot_product_perpendicular);
    tcase_add_test(tc_core, test_vec2_length);
    tcase_add_test(tc_core, test_vec2_norm);

    suite_add_tcase(s, tc_core);

    return s;
}

int main(int argc, char **argv)
{
    int number_failed;
    Suite *s;
    SRunner *sr;

    s = vector2d_suite();
    sr = srunner_create(s);

    srunner_run_all(sr, CK_NORMAL);
    number_failed = srunner_ntests_failed(sr);
    srunner_free(sr);
    return (number_failed == 0) ? EXIT_SUCCESS : EXIT_FAILURE;
}
test_vector3d.c:
#include <stdio.h>
#include <stdlib.h>

#include <check.h>

#include "vector3d.h"

START_TEST(test_vec3_dot_product)
{
    Vector3d v1 = {.x = 7.0f, .y = 2.0f, .z = 5.5f};
    Vector3d v2 = {.x = 3.0f, .y = 6.0f, .z = 3.0f};
    ck_assert_float_eq(vec3_dot_product(&v1, &v2), 49.5f);
}
END_TEST

START_TEST(test_vec3_dot_product_perpendicular)
{
    Vector3d v1 = {.x = 1.0f, .y = 0.0f, .z = 0.0f};
    Vector3d v2 = {.x = 0.0f, .y = 2.0f, .z = 0.0f};
    ck_assert_float_eq(vec3_dot_product(&v1, &v2), 0.0f);
}
END_TEST

START_TEST(test_vec3_length)
{
    Vector3d v1 = {.x = 5.0f, .y = 0.0f, .z = 0.0f};
    ck_assert_float_eq(vec3_length(&v1), 5.0f);

    Vector3d v2 = {.x = 0.0f, .y = 3.0f, .z = 0.0f};
    ck_assert_float_eq(vec3_length(&v2), 3.0f);

    Vector3d v3 = {.x = 0.0f, .y = 0.0f, .z = 4.0f};
    ck_assert_float_eq(vec3_length(&v3), 4.0f);
}
END_TEST

START_TEST(test_vec3_norm)
{
    Vector3d v1 = {.x = 5.0f, .y = 3.0f, .z = 0.5f};

    vec3_norm(&v1);

    float len = vec3_length(&v1);
    // len is not EXACTLY 1.0f due to floating point error
    // so check for a range
    ck_assert(len < (1.0f + 0.000001f) && len > (1.0f - 0.000001f));
}
END_TEST

Suite* vector3d_suite(void)
{
    Suite *s;
    TCase *tc_core;

    s = suite_create("Vector3d");

    /* Core test case */
    tc_core = tcase_create("Core");
    tcase_set_timeout(tc_core, 10);

    tcase_add_test(tc_core, test_vec3_dot_product);
    tcase_add_test(tc_core, test_vec3_dot_product_perpendicular);
    tcase_add_test(tc_core, test_vec3_length);
    tcase_add_test(tc_core, test_vec3_norm);

    suite_add_tcase(s, tc_core);

    return s;
}

int main(int argc, char **argv)
{
    int number_failed;
    Suite *s;
    SRunner *sr;

    s = vector3d_suite();
    sr = srunner_create(s);

    srunner_run_all(sr, CK_NORMAL);
    number_failed = srunner_ntests_failed(sr);
    srunner_free(sr);
    return (number_failed == 0) ? EXIT_SUCCESS : EXIT_FAILURE;
}
As you have probably noted already, every test starts with the START_TEST macro (instead of a normal function declaration) and ends with the END_TEST macro:
START_TEST(test_function_name)
{
    ...
    ck_assert_*()
}
END_TEST
Within the test function, ck_assert_* macros can be used to check the results of the test code. You find a complete list of all assert functions (and all other libcheck functions) in the libcheck API documentation.
In every test program, there is a function that creates a test suite struct. This function is then called in the main function to create said struct and execute it via libchecks test runner. Whenever you add a new test you have to make sure that you add the test to the test suite by calling tcase_add_test() in the test suite creation function. Otherwise, your test will be there but it will not be run.
The best way to make sure that you don’t miss a test is to make it fail first. This is a good idea in general because only if you have seen a test fail before you can be sure that it actually works once you fix it. Otherwise, it might just seem to succeed because the test itself is buggy.
Installing the Tools
On all three platforms, you need Python 3. If it is not already installed on your machine you can get it from Python.org.
Next, you have to install Conan via Pythons package manager pip:
$ pip3 install conan==1.59
At the time of writing, Conan is in the middle of a transition from version 1.x to 2.0. The new version is not 100% compatible with Conan 1.x but in theory, this project should also work with Conan 2.0. Since the libcheck package in Conan Center is not compatible with Conan 2.0 yet, we are sticking with the latest 1.x version.
Linux
You need to install cmake and gcc or clang via the package manager of your distribution. On Debian and Ubuntu you can use this command:
apt install cmake clang build-essential
macOS
You need to have XCode installed to be able to use clang on the command line. You also need cmake. This can be installed via Homebrew:
$ brew install cmake
Windows
You need to have Visual Studio 2022 and the C++ tools installed. CMake is already included in Visual Studio 2022.
Building the Project
To build the project for the first time we have to execute the following steps on all three platforms:
- Create a
builddirectory - Change to the
builddirectory - Run Conan and tell it to install all packages specified in the
conanfile.txt - Run CMake to generate the actual build system
- Call the generated build system (either make or Visual Studio)
Linux and macOS
On Linux and macOS the commands look as follows:
$ mkdir build
$ cd build
$ conan install .. --build=missing
$ cmake .. -DCMAKE_BUILD_TYPE=Asan
$ make
The conan install command takes two parameters. The first is the .. which tells conan that it should look for the conanfile.txt in the parent directory. The --build=missing parameter tells Conan that it should install binary packages when available but build packages from source when no binaries are available that are compatible with the compiler and the system.

After running the Conan command you will find some *.cmake files in the build directory.
As with the Conan command before, the cmake command is told to look for its files in the parent directory, too. We also tell it that the build type it should generate is “Asan”. If we wanted to we could also tell it to generate UNIX makefiles with the following parameters: -G "Unix Makefiles". But since makefiles are the default anyway we omit it.

Now our dependencies have been installed and our build system has been generated. From now on we can just call the make command to do an actual build whenever we want to.

It is not necessary to execute the conan and the cmake commands again unless you make changes to your conanfile.txt or one of your CMakeLists.txt files.
Instead of the make command, you could also use cmake --build . to build the project. This would also call make but the same command would also work if you use another build system underneath like ninja for example. But make is shorter and in our case, it makes no difference.
Windows
On Windows, you have to make sure to use the x64 Native Tools Command Prompt that comes with Visual Studio to enter the build commands. Only in this shell, you have access to all the build tools that come with Visual Studio (including the cmake binary that is bundled with Visual Studio).
To find it just enter “x64” in the Windows search box (of course, this only works if you have Visual Studio installed):

Once you have opened a x64 Native Tools Command Prompt go to the project directory and execute the following commands one after the other:
> md build
> cd build
> conan install .. --build=missing
> cmake .. -G "Visual Studio 17"
> cmake --build . --config Asan
The conan command is the same as on Linux and macOS.
We tell CMake to look for its input files in the parent directory. But this time we tell it explicitly to generate project files for Visual Studio 17 (aka Visual Studio 2022) as the build system. We then use CMakes --build command to build the Asan configuration.

If we open the solution file in Visual Studio we see that CMake has created the Asan build configuration in addition to the usual default build configurations:

Of course, you can also use Visual Studio to build your project from now on. Only when you change the conanfile.txt or one of the CMakeLists.txt files, you have to go back to the command line and run conan or cmake again.
Running the Tests
To run the tests you have to be in the build directory.
On Linux and macOS you can then run all the tests with the following command:
$ ctest .
Since Visual Studio projects are multi-configuration, you also need to pass the name of the build configuration if you are on Windows:
> ctest . -C Asan
Unfortunately, ctest doesn’t print the output of failing tests by default. So everything is fine as long as all tests pass. But once you have failing tests you want to add the --output-on-failure flag to the command:
$ ctest . --output-on-failure
Now ctest will no longer suppress error messages from the test binaries. Best try it for yourself by changing one of the tests to make it fail, compile the project again, and rerun the tests.
If you only want to run one of the test suites you can just execute the test binary directly. E.g.:
$ ./tests/test_vector2d

Sanitized Testing
Now that we know how to run the tests it is time to check if Address Sanitizer actually works. So open the file tests/test_vector2d.c and change the last line of the first test from
ck_assert_float_eq(vec2_dot_product(&v1, &v2), 33.0f);
to this:
ck_assert_float_eq(vec2_dot_product(NULL, &v2), 33.0f);
After recompiling and running the test from the build directory with
$ ./tests/test_vector2d
you should get a very informative crash, very similar to this one:

Without Address Sanitizer, our program would just crash without further comment and we would need to run it in a debugger like gdb to figure out what happened. Thanks to address sanitizer we get a nice stack trace that leads us directly to the root of the problem.
Of course, NULL pointer exceptions are the less interesting kind of problem because they would also lead to a crash without address sanitizer. It is a lot more interesting when address sanitizer starts crashing your program on problems that would normally not lead to a crash like out-of-bound reads on arrays, for example.
To test this you can just change the first test in test_vector2d.c to look like this:
...

int nums[10];

START_TEST(test_vec2_dot_product)
{
    for (int i = 0; i < 11; i++) {
        nums[i] = i;
    }
}
END_TEST

...
The resulting crash is more informative than before:

The text in green tells us about a global variable of size 40 (10 x sizeof(int)) and it also tells us that we tried an invalid memory access 0 bytes right of it. This wouldn’t happen if the condition in the for loop was i < 10 instead of i < 11. With the last loop iteration we try to access the 4 bytes next to the last element of the array and this is Address Sanitizers way of informing us of our mistake.
Sanitizers are great tools to uncover bugs that we don’t know to exist in code that we believe to be perfectly fine. When you combine them with unit tests can they can put the quality of your code to a new level.
If you are on Linux, it is a great idea to try the other sanitizers, too.
Final Thoughts
I hope this article gave you some ideas for your next project and maybe you also got inspired on how to improve existing projects.
Feel free to use this project template for your own projects and if you would do things differently share it in the comments.

Pingback: 如何运用CMake和Conan创造现代化的C++工程 – 偏执的码农
This is really helpful. Thanks!
I had been having a lot of trouble setting up projects with CMake before.
LikeLike